Fine-tuning an LLM with LoRA on Windows using the CUDA GPU

The Surge in LLMs
The past year has seen a huge surge in the availability of powerful and capable LLMs (Large Language Models). Few are commercially available proprietary models (for e.g, Google’s Gemini, PaLM2 and Open AI’s GPT-4), while majority of these offerings are licensed as permissive open sourced models. Whie the AI industry has been slowly increasing AI related patents, the number of open source AI models has been exploding. Lets try to understand at least one of the main technologies behind this surge.
One of the biggest contributors to the increase in LLMs that has had a huge multiplier effect is LoRA (Low-Rank Adaptation), a type of Parameter-Efficient Fine-Tuning (PEFT) technique that allows a PEFT trained LLM to run with low cost and low resources, sometimes even on commodity hardware. Another crucial advantage of LoRA that deserves a mention here is that a LoRA trained LLM is much easier to run in a multi-tenant environment. This benefit combination has created the perfect storm that has fueled the construction and consumption of these LLMs.
What is LoRA?
LoRa is a Parameter-Efficient Fine-Tuning (PEFT) technique to tune LLMs. A typical LLM has billions of parameters trained over many days with high costs. For example, Llama2–70B has 70 Billion parameters and can easily demand 100s GBs memory to load it in a production system. On top of that the base LLM is perhaps going to need tuning for different users or use cases. It can be extremely challenging to operationalize large LLMs in a secure and scalable way as a multi-user solution within an enterprise or the cloud provider.
Techniques such as prompt engineering and RAG (Retrieval Augmented Generation) while low in cost are limited by how much context can be passed to the LLM in each query. On the other hand, full fine-tuning can be cost prohibitive to operationalize as it requires training and recomputation of all the parameters of the LLM.
In LoRA, the parameters of the base LLM remain unchanged. Instead, two smaller weight matrices are trained during fine-tuning. These weight matrices serve as smaller adapters that can be paired with the base model to get customized results. These adapters can be individualized for specific use cases or for specific users. Each LoRA adapter ends up being very small, between 6MB-8MB. While the main LLM can run as a standalone service in production these adaptors can be stored along with other user context in a multi-tenant system. LoRA works because smaller weight matrices contain smaller number of parameters and is much easier and faster to train.
A variation of LoRA, called QLoRA combines the benefits of LoRA with the usage of lower precision weights during fine-tuning to achieve promising results. In QLoRA, the pre-calculated weights of the (larger) base LLM are also quantized using lower precision storage.
The mathematics behind why QLoRA works is the discovery that for AI/ML use cases, if the model weights are stored with half the precision (reducing the memory required for loading the model by 50%), the model inference accuracy does not suffer by a lot. For LLMs this functions like model compression and this means that the compressed model will take even lesser space and time to run.
Now that we have explained this, lets attempt to use QLoRA on a pre-trained model. For this exercise, I chose a Windows Gaming Station that I built almost ten years ago.
Running QLoRA on Windows — Quick Case Study
So, I attempted to fine-tune Meta’s Llama-2–7b on my son’s Windows Gaming PC using QLoRA. The PC has an NVIDIA GeForce GTX1060 (6GB Memory). While linux happens to be my forte, I wanted to avoid changing too many things on the machine, which was heavily used for gaming during the summer and winter holidays. While Linux is still the workhorse for ML development, Windows is definitely up and coming. There are enough tools for ML development on Windows. Next, I provide the code and few extra installation tips to replicate QLoRA training on your own Windows PC (with a GPU).
The notebook I used can be found here. This same code will work on a Windows PC with a minor change to utilize the NVIDIA GPU instead:
model = AutoModelForCausalLM.from_pretrained(
    base_model,
    quantization_config=quant_config,
    device_map="cuda:0"
)
In order to run this notebook, you have to install the python dependencies that are mentioned in it. In addition you need the NVIDIA CUDA and cuDNN packages. Other helpful packages are Jupyter and Git. You will need Visual Studio Community Edition to help compile the bitsandbytes package— A key library necessary to perform the quantization of weights. This package is not supported on Windows. While the package is installed as part of the dependencies, it is missing the dynamic libraries needed on Windows. The following compilation commands will help build the missing Windows libraries which need to be installed as per this hack provided here.
"c:\Program Files\Microsoft Visual Studio\2022\Community\Common7\IDE\CommonExtensions\Microsoft\CMake\CMake\bin\cmake" -B build -DBUILD_CUDA=ON -DCOMPUTE_BACKEND=cuda -S .
"c:\Program Files\Microsoft Visual Studio\2022\Community\Common7\IDE\CommonExtensions\Microsoft\CMake\CMake\bin\cmake" - build build - config Release
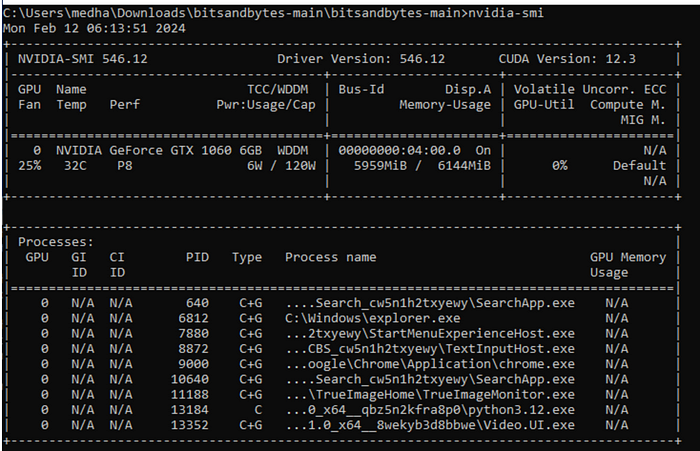
This exercise was definitely encouraging. The performance of the NVIDIA GPU can be monitored using the nvidia-smi command that indicates memory usage and few other interesting pieces of data like the fan, temperature and other processes using memory on the GPU.

I will continue to explore a few more LLMs and notebooks and update my findings here.
Thanks for reading and Good Luck!